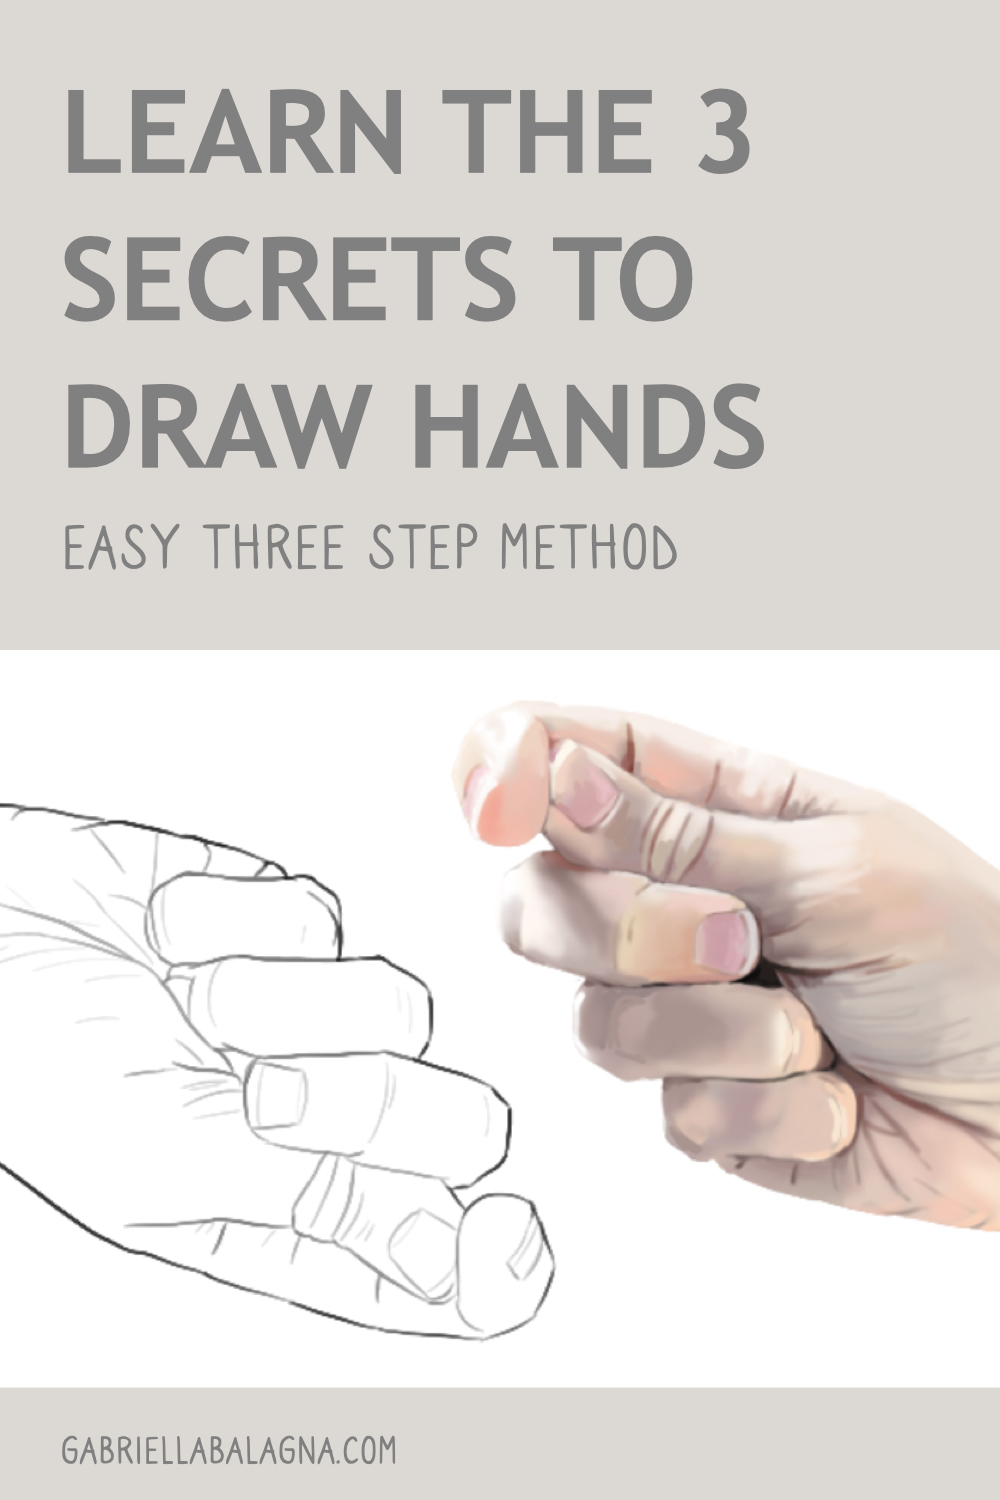
How to Draw Hands – Learn the Secrets of the 3 P’s
How to draw hands using three easy steps! This is a simple and easy to remember method. And it works for artists of all skill levels. Plus, for each step of the method, lots of detailed tips are provided.
This is not a one and done tutorial that only teaches you how to draw a few different hands. Rather, this is a study method to help you teach yourself how to draw hands better from any position. Simply learn this method, and test it out. Then you will be able to draw hands more easily and at an increased level.
You may be wondering what makes this tutorial different than others. Well, I have tried many different tutorials and videos on how to draw hands. But I still could not draw hands well. So I created this method myself through years of trial and error as a self taught artist. And I am sure other self taught artists use a similar strategy to get better at drawing hands.
Furthermore, this three step method for drawing hands can actually be applied to any subject matter you want to improve at drawing.
So just what are steps of the three P’s to draw better hands? The steps are:
- Preparation
- Proportions
- Practice
Continue reading to learn detailed advice for each step.
1. How to Draw Hands By Using PREPARATION
The first step to drawing hands better is preparation. Preparation involves gathering reference material, learning how to use references, and choosing your tools. Learn the details below on why this is such an important step. As well, learn about some valuable hand drawing resources.
Gather Reference Material
Before you even start drawing hands, you need to prepare by getting some reference material. For example, you can use yourself or someone else as your hand model. Drawing from life makes for a great reference as you really get a sense of the volumes of the hand.
Other great reference materials include tutorials, 3d models, sculptures, videos, or other artists’ drawings. Books on how to draw hands are great as well. For example, Drawing the Head and Hands is a helpful book I enjoy. #affiliatelink
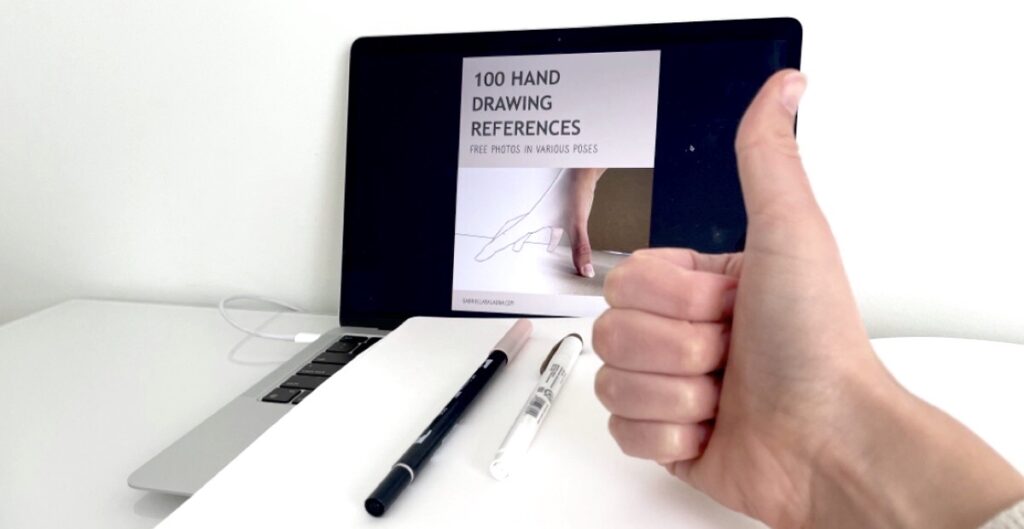
Another idea is to find photos of hands online that you can use for reference. It can be tough to find free, quality photos though. So that is why I put together a free PDF of 100 photos of hands.
Learn How to Use References
Another part of preparation involves learning how to properly use references. Knowing how to use references to improve your art can be a bit confusing if have not done it before. So, to draw hands better, first prepare by learning how to use references in your art.
Choosing Your Tools
There is one more part of preparation, and that is choosing your tools. As well, this includes finding a comfortable workspace. Of course, any medium can be used to practice drawing hands. So you should choose whatever medium you enjoy.
However, certain mediums are better suited for certain aspects of learning how to draw hands. For example, if you want to focus on better line-work, a pencil or ink is a good choice. If you want to focus on improving contrast or depth, try working in just one hue. Contrastingly, if you want to focus on the coloring of hands, you will need a variety of paints, markers, or other colored tools. Finally, if you want to practice drawing hands more confidently, a permanent pen or marker makes a great choice.
Once you complete the preparation step, you can move on to the next step below.
2. How to Draw Hands By Using PROPORTIONS
The second step to drawing better hands is all about understanding proportions. This includes studying the volumes and sizes of hands, the underlying anatomy of hands, and stylization. By increasing your knowledge of the proportions of the hands, you will be able to draw them more easily and accurately.
Study Volumes & Sizes
One part of studying hand proportions, is learning the volumes and sizes of the parts of the hands. Memorizing the standard volumes and sizes will help you to draw hands better. Of course, everyone’s hands vary in size. But it is helpful to memorize the general sizes of palms, fingers, nails, etc. That way you can draw them proportionally to one another.
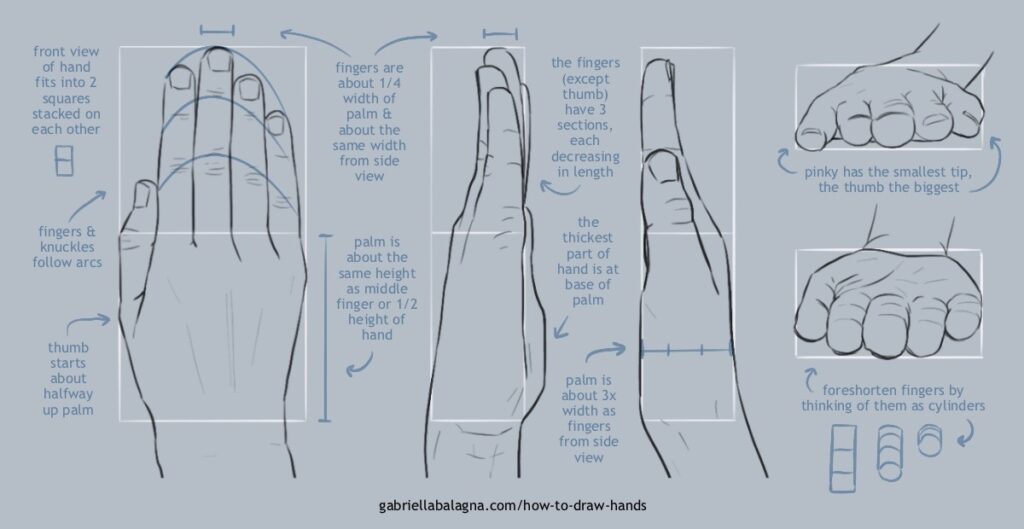
After completing the preparation step (as discussed above), determine the volumes and sizes of each part of the hand. You can find this information in a how to draw book or you can approximate it yourself. Whatever your findings, it helps to write them down using both pictures and words. Try to take a sufficient amount of notes. Then, try to commit your notes to memory.
Below are some example notes you could take. To understand proportions better, you can copy these notes down. However, make sure to take your own notes on volumes and sizes of hands as well. Discovering facts yourself will help you to remember them better.
Study Anatomy
Another part of learning proportions is studying the anatomy of hands. By doing so, this will help you to draw hands better both from reference and imagination.
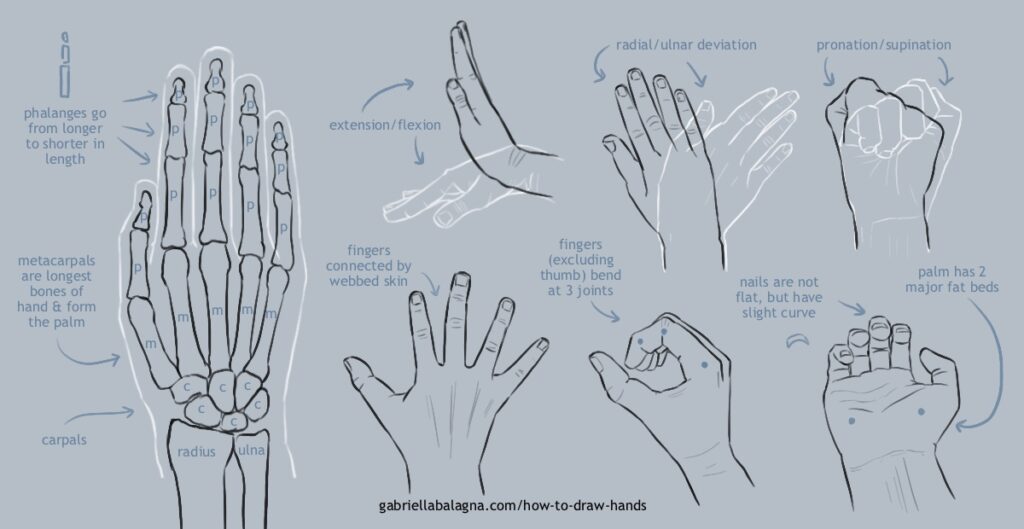
For instance, learning the underlying structure of the hand will help you to draw the fingers at the right angles. As well, it will help you to properly place the joints of the fingers. So try to learn the anatomical proportions of the hand. Some things to study include the bones, joints, tendons, and muscles of the hand. Also, it is helpful to study how the hand attaches to the arm at the wrist.
Likewise, learning the range of motion of the hand will help you to draw more accurate poses and a bigger variety of poses. It is helpful to learn just how far the hand can bend in each direction. As well, it is helpful to learn all the different ways the hand can move.
So using some reference material, take notes on, and memorize the anatomical proportions of the hand. It helps to use a combination of words and images to take down your findings. Below are some example notes you could take. You can copy these, but make sure to take your own notes as well.
Study Stylization
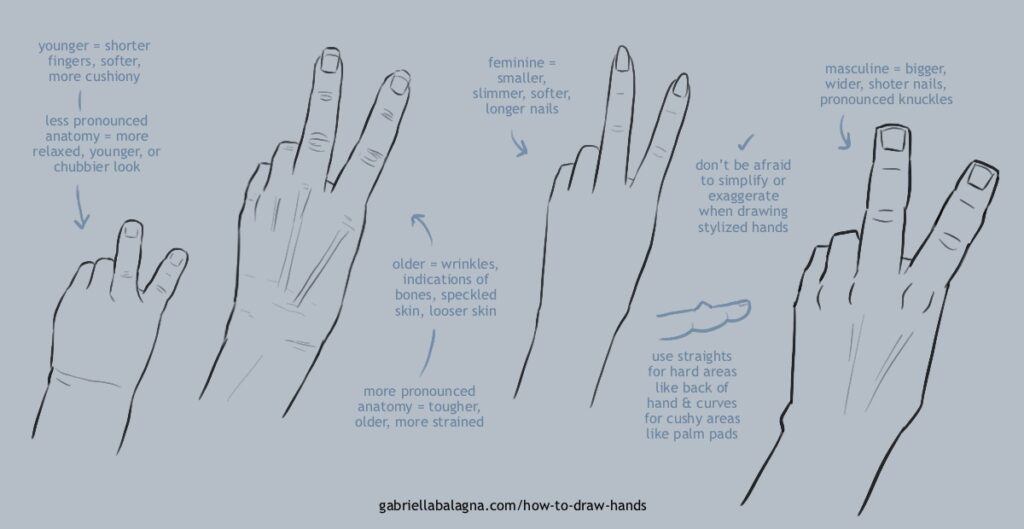
Another type of proportions you can study are stylized hands. It can be helpful to study both realistic and exaggerated styles. Stylized hands have proportions or features that are exaggerated. Also, stylized hands can make for a more interesting drawing or better readability of a pose. Practicing both exaggerated and realistic hands will help you to draw hands more easily.
Additionally, studying cartoon hands can actually make drawing realistic hands easier. Cartoon hands often have less detail, simplify parts of the hand, and make certain aspects more pronounced. By studying cartoon hands, it can make it easier to remember and understand how to draw hands.
Likewise, drawing hands in a stylized and simplified manner is a good exercise. For example, practice drawing hands using only very straight and very curvy lines. This will help you to remember which areas of the hand are hard/bony and which areas are soft/cushiony. Similarly, you can try drawing the hand using only a rectangular prism for the palm and cylinders for the fingers. Drawing the hand using this method will help you to draw hands with better perspective.
Additionally, stylized hands can have different proportions which fall under different stereotypes. Stereotypes can be useful to create hands that appear young, old, feminine, or masculine. Also, stylized proportions can help create hands that look thin, thick, small, big, soft, or hard.
So, using some reference material, study how stylization can be applied to hands. Just as when studying other things about drawing hands, you will want to take notes to help comprehend and memorize tips about stylization. Likewise, you can study how stylization can be used to create certain stereotypes of hands such as young, old, female, and male. Below are some example notes on stylization.
3. How to Draw Hands By Using PRACTICE
The third and final step to draw better hands is practice. It would be great to wake up one day and be a master at drawing hands. Nonetheless, time and dedication are required to improve at drawing hands. Below are a few different tips on how to practice drawing hands. These tips talk about how to plan out drawings, why draw bigger, why draw more, how to add color, and how to create polished drawings.
Plan Things Out
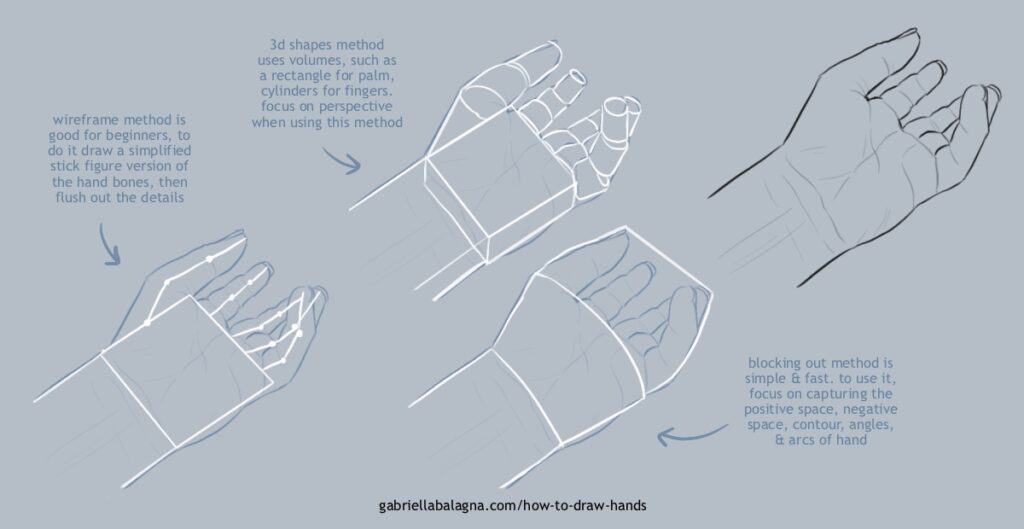
When practicing drawing hands, there are a few methods you can use to plan things out. And using these methods can help you to draw hands more accurately. Three methods for planning out your drawings are shown below. These include the wireframe method, the 3d shapes method, and the blocking method.
Which method should you use for drawing hands? Well, depending on what pose you are trying to draw, a certain method might work better. Also, do not be afraid to switch between methods or combine them.
Additionally, you can use these planning methods to do lots of quick studies of hands. Or you can use these methods to create sketches, and then add finished drawings over top. So, after grabbing some reference material, (as discussed above,) practice drawing hands with each of these methods.
Draw Bigger & More
Another practice method is to draw bigger and to draw more. This is an easy form of practice that will help you to draw hands better.
For example, by drawing bigger you can fit in more details. As well, you can see more clearly what areas of your drawings are lacking. In addition, drawing bigger will also help increase your understanding of proportions. This is because drawing bigger makes it easier to see how different parts of the hand compare in size. Also, drawing bigger will help you gain more confidence at drawing. This is because you will be forced to confront your fears, rather than drawing small hands and hoping no one will notice the mistakes.
Furthermore, drawing more hands is a great way to experiment and “fail faster.” So do not be afraid to draw ugly hands or make mistakes. As well, by drawing more hands, you can draw a bigger variety of hands. So try drawing hands at different sizes, ages, angles, and poses. Additionally, be sure to practice drawing hands holding various objects.
As well, do not just spend one session practicing drawing hands. Make sure to practice as frequently as you need to see improvement. Or, try taking on a challenge to draw a large number of hands, such as ten a day for ten days.
Adding Color
When it comes to drawing hands, another thing to practice is adding color. Once you are familiar with drawing the hand, adding color can be a fun next step to take your drawings to the next level. Adding color is not as simple as it seems though. There are few different things to practice when it comes to coloring hands.
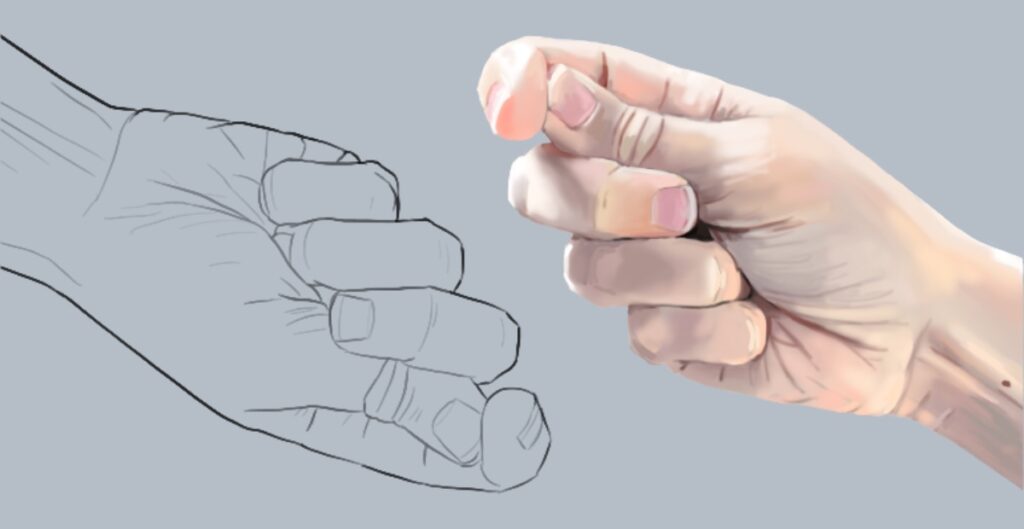
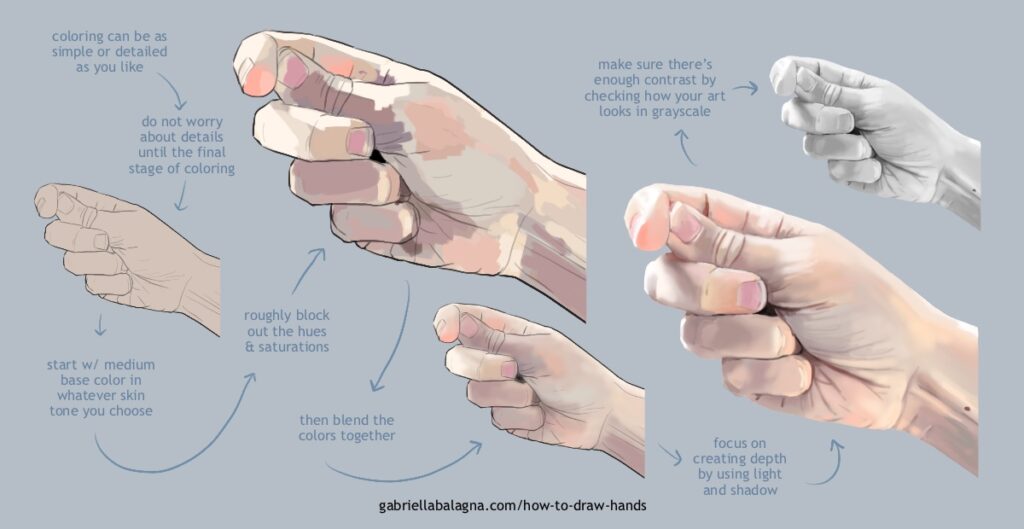
For instance, you can focus on adding shadows and depth. As well, you can try different styles of coloring. These can include cell shading and soft shading. Another thing to practice is choosing appropriate colors for a natural or realistic look. This includes learning how to paint different skin tones, which areas are naturally redder, and how palms are often lighter due to less sun exposure.
Below is a simple explanation of how to color hands in a painterly style. Many painters do not start with an underlying sketch, but this is the method that I find easiest. When starting out, do not try to guess what colors to use yourself. Instead, make sure to use reference, as discussed earlier.
Polish Things Up
A final part of practicing to draw better hands is getting better at polishing up your drawings. This just means adding a certain level of skill and tidiness to your art.
To make your hand drawings look more polished, there are a few things you can do. For instance, do not be afraid to make adjustments or redraw things. As well, try to avoid using sketchy, choppy lines, as these do not look very neat. Instead, try to use smooth, confident lines. Moreover, if drawing traditionally, make sure to draw lightly so your sketch will erase well.
Finally, know that with time and practice the level of polish in your drawings will improve.
That Is How to Draw Hands Using the 3 P’s
In summary, to draw hands better, just apply this three step method:
- Preparation (Gather references, learn how to use references, choose tools.)
- Proportions (Study volumes and sizes, anatomy, and stylization.)
- Practice (Plan out drawings, draw bigger, draw more, add color, and add polish.)
So, are you ready to try out this method and draw some hands? Here’s 100 Free Hand Drawing Reference Photos for you to use.
Like this article? Spread the word by sharing it on social media. Also, be sure to subscribe for more content like this. As well, check out my webcomic, Kindred Not.
Discussion (3) ¬