How to Draw Arms – 10 Common Mistakes
Are you ready to learn how to draw arms better? In this article are ten common mistakes for drawing arms and how to fix them. The topics include advice on sketching, anatomy, and poses. Every artist, even myself, makes lots of mistakes when drawing arms. So artists should not put themselves down if they struggle to draw arms. Rather, by reading and applying this advice, artists can quickly improve their ability to draw arms.
Additionally, this tutorial is different than others. It does not simply teach step-by-step, on how to draw arms in one or two poses. Rather, this tutorial teaches mistakes to avoid when drawing arms. Even more, it helps artists understand how arms bend and move. Thus, by learning the tips in this article, artists can improve their overall ability to draw arms in any pose.
Another thing to note, is that there are obviously many types of arms. For instance, lanky, short, bodybuilder, or elderly. But this article focuses on drawing male arms with some muscular definition. The reason is, artists can just add or remove a little muscular from this arm type to end up with some other types of arms. Accordingly, that makes it a great arm type to learn.
Topics
Below is a list of the topics in this tutorial. Reading each of the tips is a great start for drawing better arms. But to solidify the tips in your memory, taking notes and sketches is very helpful. So grab something to write with and dive in!
- Example of How to Draw Arms
- 1. How to Plan Out Arm Drawings
- 2. How to Study Arms from Reference
- 3. How to Draw Arms with Asymmetry
- 4. How to Draw Flexion & Extension
- 5. How to Properly Place Muscles
- 6. How to Draw the Back of the Arm
- 7. How to Draw the Forearm
- 8. How to Draw Arms Reaching Up
- 9. How to Draw Bent Arms
- 10. How to Draw Foreshortened Arms
Example of How to Draw Arms
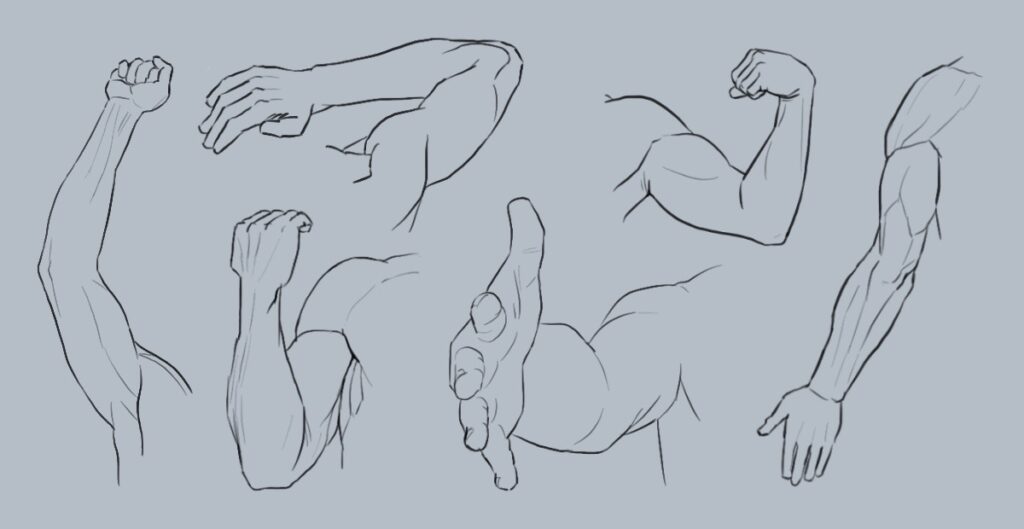
Up next are ten common mistakes and fixes for drawing arms. But first, I thought it important to show one method I like to use for drawing arms. (The image below shows this method.) This method is a bit tedious to use all the time. However, it is great to use when studying arms from reference. As well, this method is helpful when trying to construct arm drawings from “imagination.” So I recommend artists use this method when trying to increase their ability to draw arms.
Later in this article are deeper explanations of why this method is helpful. As for now, here are the steps of this method:
- Block out the pose and simplified bone structure.
- Sketch in all the muscles over the bones.
- Make adjustments.
- Simplify to only the surface anatomy.
1. How to Plan Out Arm Drawings
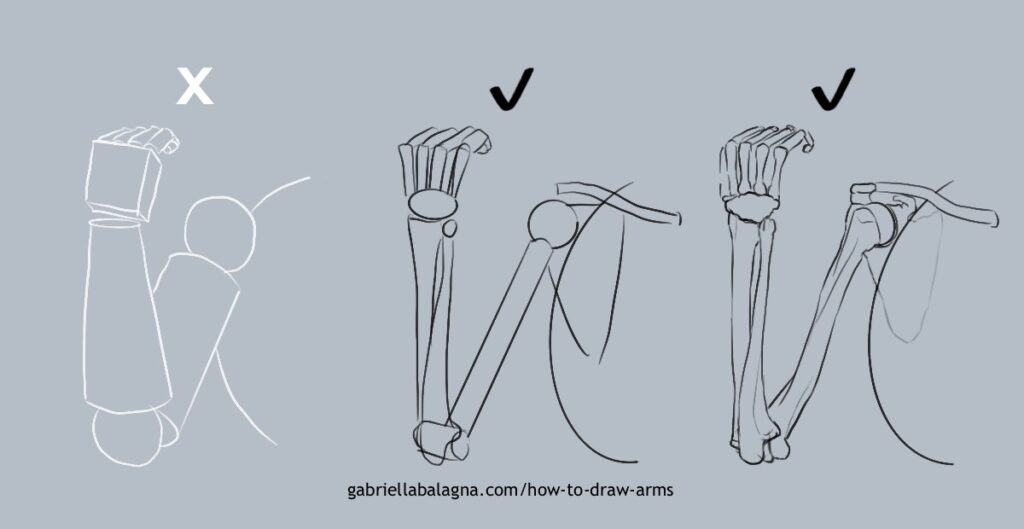
The first common mistake I see with drawing arms is how artists plan out their drawings. Many tutorials advocate for the mannequin method. This method resembles those flexible wooden dolls. I have tried this method many times before, but did not like it very much. (An example of this method is shown on the left in the image below.)
The mannequin method is an okay method of drawing arms for beginners. However, it hinders artists’ ability to draw more muscular or anatomically correct arms. This is because the forms and joints it uses are not very accurate to human anatomy. So, while it is good for understanding perspective, the mannequin method is not very good for drawing more realistic arms.
Instead, a better way to plan out arm drawings is to use arm bones as a base instead. (Examples of this are shown in the middle and right drawings in the image below.) To draw better arms, artists should study human bones, and and use that as their base for planning out their drawings. It is helpful to first learn how the bones function. Then, when planning out drawings, artists can just draw simplified bones to make things easier and to save time. After drawing the bones, artists can layer over the muscles. This method will create a much more anatomically accurate arm.
So to draw better, more anatomically correct arms, learn more about the arm bones, and practice drawing them. For instance, find some high quality images of arm bone anatomy to study from.
2. How to Study Arms from Reference
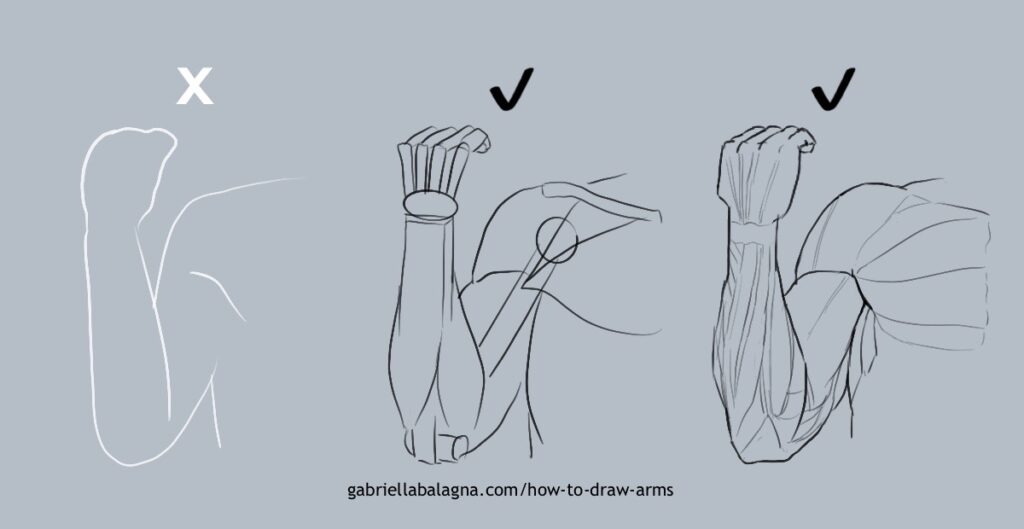
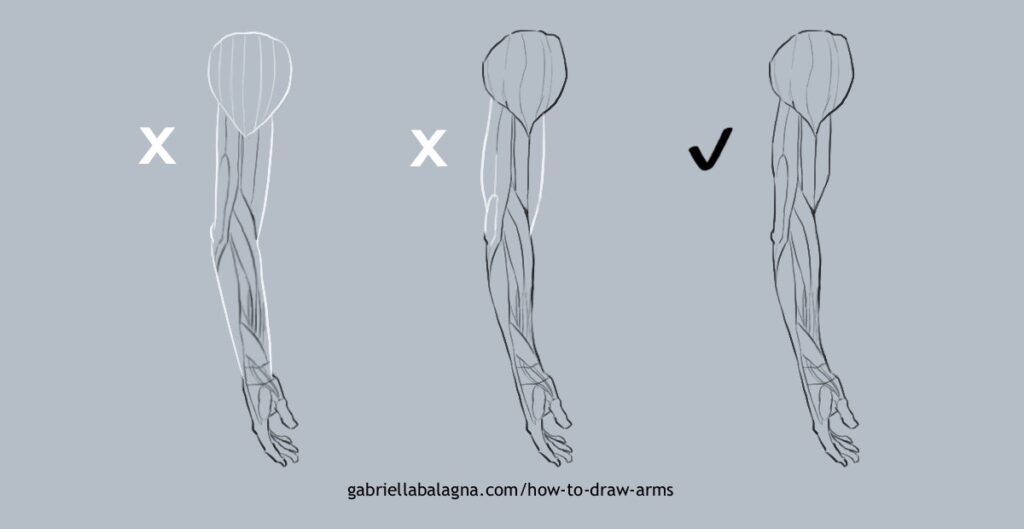
Another common mistake with drawing arms, is studying reference images the wrong way. When using reference, many people, even myself, focus too much on contour and negative space. The contour method is okay for blocking out sketches. (An example of this method is on the left in the image below.) However, artists will not learn much from the contour method. Likewise, contours are pretty hard to remember. So the contour method does not greatly increase artists’ ability to draw better arm anatomy or arms from imagination.
Instead, when studying arms from reference, try to understand the underworking anatomy. (Examples of this are shown in the middle and right drawings in the image below.) For instance, try to figure out where the arm bones are, as discussed previously. As well, try to understand the origin and insertion of the major arm muscles. By understanding these things, artists will be able to draw better arms in any pose, even from imagination.
So to properly study arms from reference, try to understand the anatomy of the underlying bones and muscles. To do so, here is an article with lots of high quality images of arm muscle anatomy to study.
3. How to Draw Arms with Asymmetry
A third common mistake with drawing an arm is making the front and back too symmetrical. (An example of this is the drawing on the left in the image below.) This issue is another reason to avoid the mannequin method, as discussed earlier. Unlike the mannequin method, an arm is not a series of symmetrical tubes. Rather, the types of muscles on an arm are asymmetrical from each other. This is because they all have different points of origin and insertion. Or, in simpler terms, the muscles all start and end at different heights. Additionally, muscle fibers do not run perfectly symmetrical or parallel.
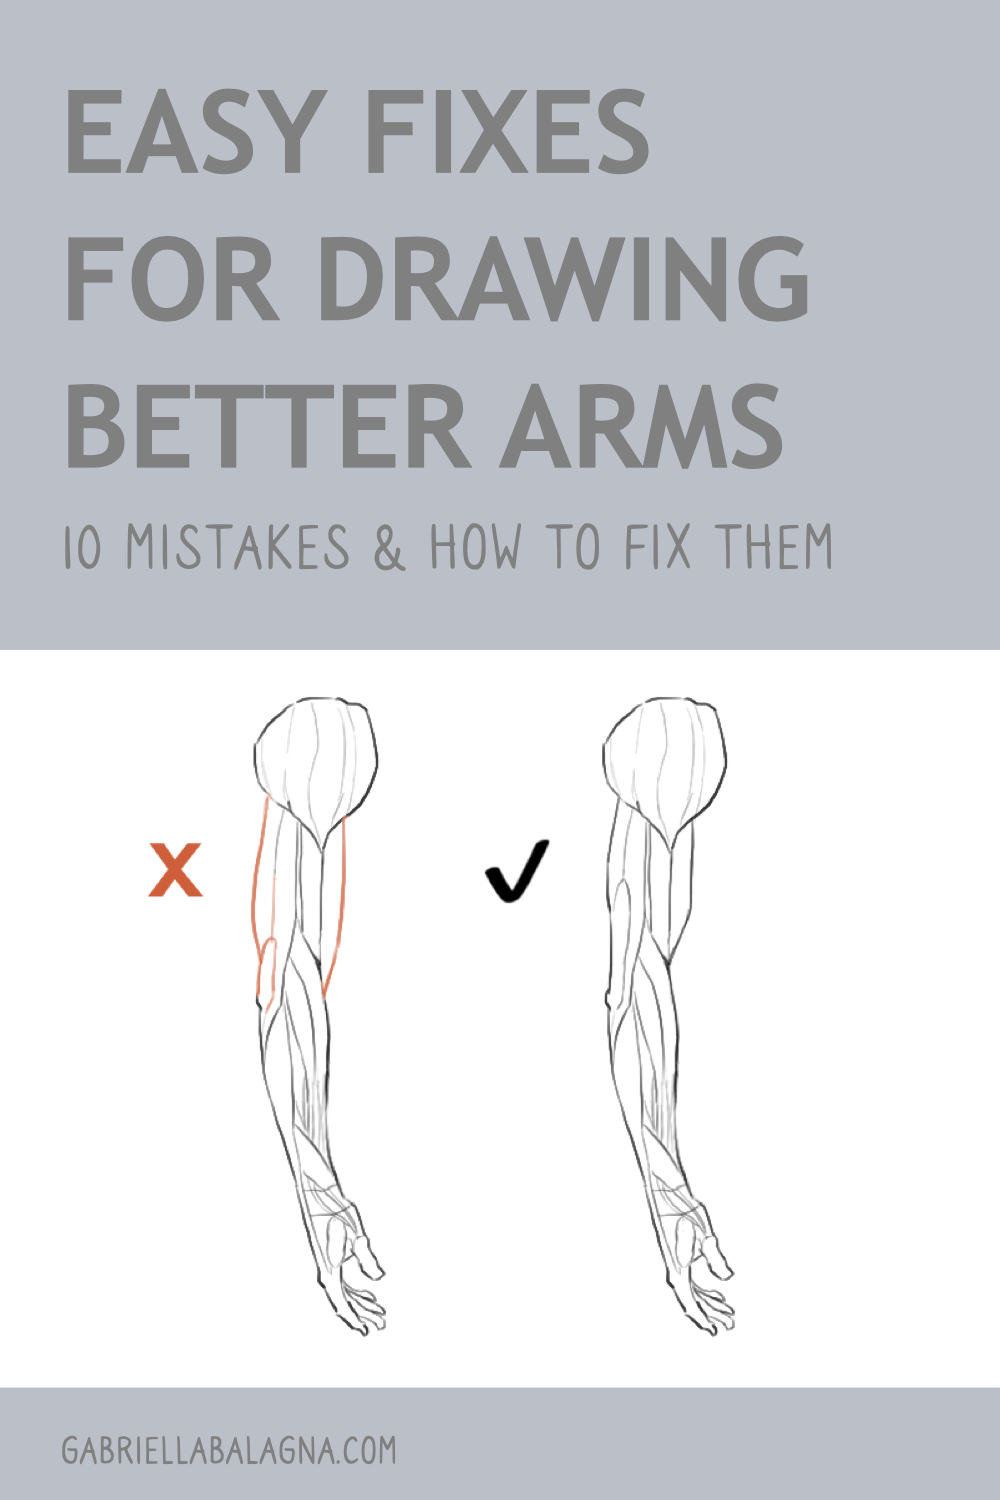
Another thing to note about arms are the lengths of each muscle. Personally, a mistake I commonly make is drawing the triceps and biceps too long. (An example of this is shown in the middle drawing in the image below.) Similarly, another common mistake is making those muscles too symmetrical. But the triceps and biceps actually have different shapes.
So to draw a better arm, we need to make it look more organic. By this I mean to draw it asymmetrical and with rhythm. In other words, from the lateral/side view, the muscles jut out at different heights, each lower than the next. (An example of this is the drawing on the right in the image below.) For example, the triceps should stop a little higher, then the biceps, then the forearm flexors, then the forearm extensors. To become more familiar with these muscles, study some diagrams of arm muscle anatomy.
4. How to Draw Flexion & Extension
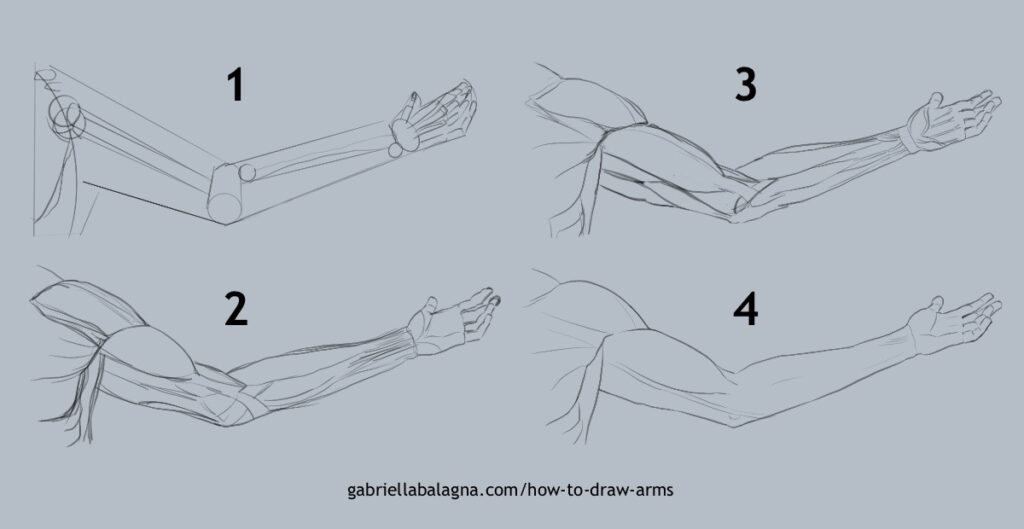
A fourth common mistake with drawing arms is not understanding flexion and extension. Flexion just means that the muscles are contracting/squishing/pulling. Extension is the opposite; it is when the arm muscles are extending/lengthening/stretching. It is important to understand which muscles are flexors versus extensors. That is because it will help artists to know when to make an area of the arm concave or convex. As well, how concave or convex to make it.
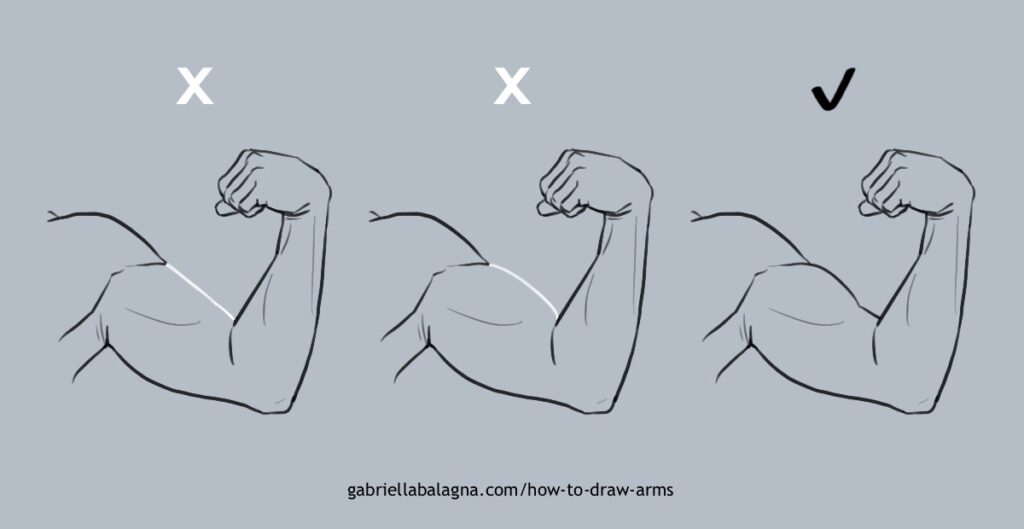
For example, a common mistake with flexion is drawing the biceps wrong. (Examples of this are the drawings on the left and middle in the image below.) When the arm is flexing, the biceps are contracting, and thus should not look flat. However, the bump the biceps create does not reach all the way to the midpoint of the arm. Rather, that part of the biceps is flatter. (A good example of this is the drawing on the right in the image below.)
So, to draw better arms, make sure to understand flexion and extension. Likewise, it is important to know which specific muscles help the arm move in different ways. A great way to study this is learning different arm exercises. For example, tricep dips, pushups, and planks. Not only does this provide a little workout, it will help artists better understand the function of each muscle. Thus, learning arm exercises will enable artists to draw arm flexion and extension better.
5. How to Properly Place Muscles
Another common mistake with drawing arms is improperly placing muscles. Placing muscles properly can be quite confusing because the arm can rotate at the shoulder, as well as at the forearm. One commonly misplaced muscle group is the brachioradialis and extensor carpi radialis longus. Other commonly misplaced muscles are the biceps and triceps. (An example of these misplaced muscles are the drawings on the left and middle in the image below.)
However, there are a few ways to combat the problem of misplacing muscles. One way is to memorize what plane of the arm the muscles are on. For example, the biceps are on the anterior/front. Whereas, the triceps are on the posterior/back. Another trick is memorizing where the muscles insert. For example, the brachioradialis inserts on the thumb side of the arm. To place it properly, it should always angle towards the thumb. So apply these concepts with each muscle to quickly improve at drawing better arms.
6. How to Draw the Back of the Arm
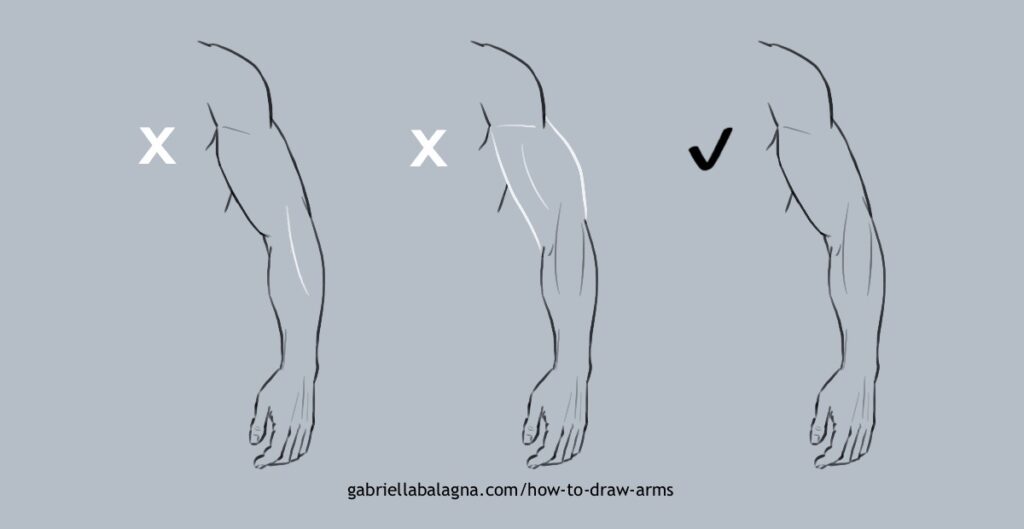
An additional common problem with drawing the arms, is how to draw the back of the arms. When it comes to drawing, our brains often simplify things too much. So sometimes, artists draw the arm overly simplified and curvy. As well, as discussed earlier, it is a common mistake to make things too symmetrical. (Examples of these mistakes are the drawings on the left and middle in the image below.)
However, no need to repeat these mistakes. Here are a few tips for drawing the back of the arm better. Firstly, try to use more complex lines when drawing muscles like the deltoid. Rather than one soft curve, try using a flatter, more angular line. Secondly, remember that the triceps are not symmetrical. Instead, they have two heads on the inside, one head on the outside, and a flat tendon in the middle. Thirdly, drawing the ulna bone will help add more detail around the elbow and forearm. (An example of applying these three tips is the drawing on the right in the image below.) So be sure to study these three things to help draw the back of the arm better.
7. How to Draw the Forearm
Another common problem with drawing arms is struggling how to draw the forearm. It is easy to remember the general shape of the forearm as a chicken drumstick. However, just memorizing this general shape is not enough to make the arm look realistic. Another problem with the forearm, is forgetting that the arm is soft, and when it is bent the arm muscles can get squished. Likewise, another problem when drawing the forearm is always making the elbow pointy. (Examples of these problems are shown in the left and middle drawings in the image below.)
To combat these mistakes when drawing the forearm, all artists need to do is commit a little bit of anatomical information to memory. Firstly, the wrist area is quite boxy due to the underlying bones. Thus, it can be drawn with straighter lines. Secondly, artists need to study when the elbow should appear more pointy, versus square. This depends on if/when the ulna and humerus bones can be seen in a particular pose.
Additionally, artists need to learn the anatomy of the forearm muscles. Artists can remember these muscles by simplifying them into two groups: flexors on the front of the arm, and extensors on the back. As well, artists should remember that when the arm is bent tight, these muscles can get squished and stick out a little extra. Knowing this information will help artists to draw the forearm better.
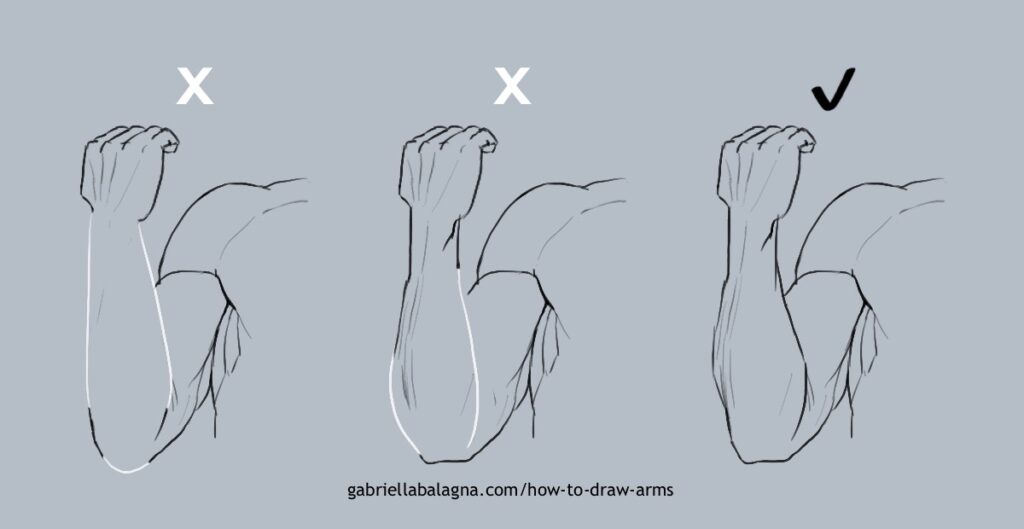
8. How to Draw Arms Reaching Up
Next are a few mistakes that are easy to make when drawing the arms reaching up. (Examples of these mistakes are the drawings on the left and middle in image below.) Firstly, the elbow is not a little spot or square. Secondly, the armpit is not a simple little crevice. Thirdly, when the arm is reaching up, the deltoid is no longer very visible on top of the arm. Fourthly, when drawing the arm raising up, it is easy to confuse which direction and what muscles are overlapping.
Let’s tackle each of these issues one by one. Firstly, the elbow is made up of bones that lead up and down the arm. Accordingly, try to use lines that properly indicate this. Secondly, to draw the armpit, focus on learning how the pecs, coracobrachialis, latissimus dorsi, and serratus anterior muscles overlap. Thirdly, remember that when the arm raises up, the deltoid moves towards the back and becomes hidden by the pecs. Fourthly, to properly overlap the muscles, focus on their origin and insertion. These four things will help artists more easily and accurately draw arms reaching up.
9. How to Draw Bent Arms
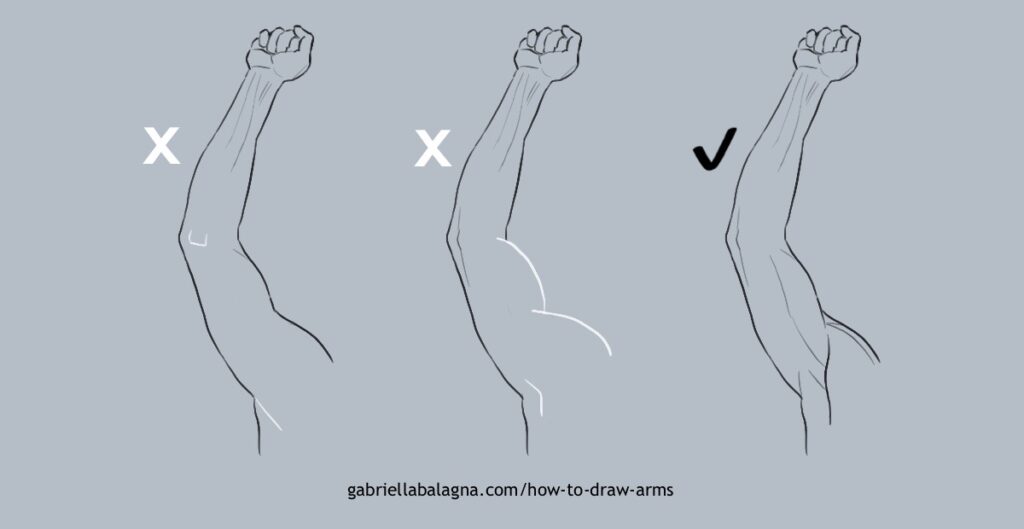
A ninth issue artists face when drawing arms is how to draw them bent. There are a few confusing aspects that arise when trying to draw bent arms. One is the elbow; it is easy to overly simplify it and make it too pointy. Another is how to wrap/bend the muscles when the arm is bent. Thirdly, is leaving a big gap, rather than overlapping the top and bottom of the arm. (These issues are shown in the left and middle drawings in the image below.)
For these reasons, here are a few tips on how to draw bent arms. Firstly, stop thinking of the elbow as one spot. Instead, study the three main parts where bones can show at the bend of the arm. These are the olecranon of the ulna and the two epicondyles of the humerus. The olecranon is the pointy area we typically think of the tip of the elbow. As for the epicondyles, I like to think of those as the sides of the elbow.
Secondly, pay special attention to the brachioradialis and extensor carpi radialis longus. These muscles flow from the upper arm, to the forearm. Thusly, when the arm is bent, show these muscles as a bulge, bending with the arm.
Thirdly, pay attention to the negative space when drawing bent arms. Specifically, make sure that the space between the upper arm and forearm is not too big. Likewise, pay attention to the angle that the arm is bending. It will look very different depending on how bent it is. So try to study how the arm changes as it bends tighter. Learning these things will help artists to draw better bent arm poses.
10. How to Draw Foreshortened Arms
Finally, one more difficult concept of drawing arms is how to properly foreshorten them. The word foreshortening is pretty self explanatory. You take a shape or line and shorten it to make it appear foreshortened.
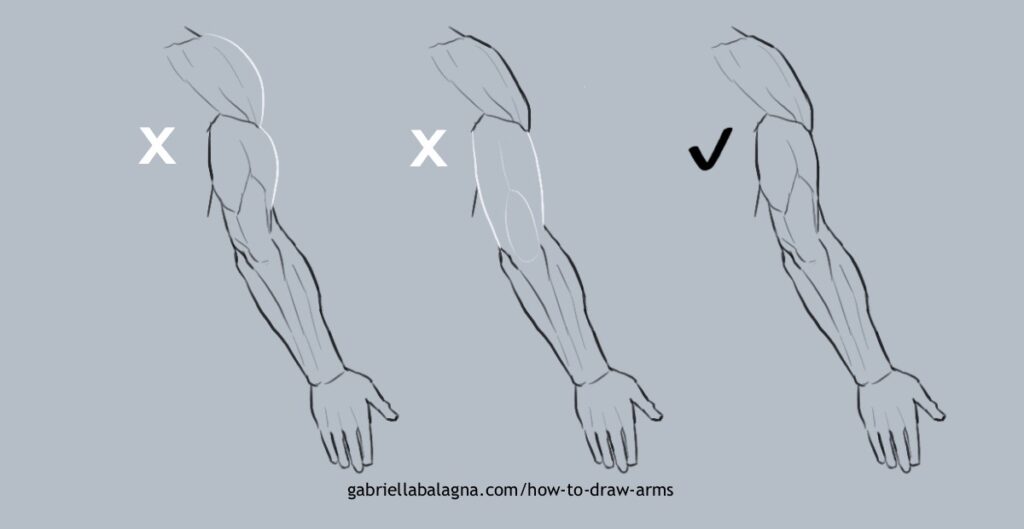
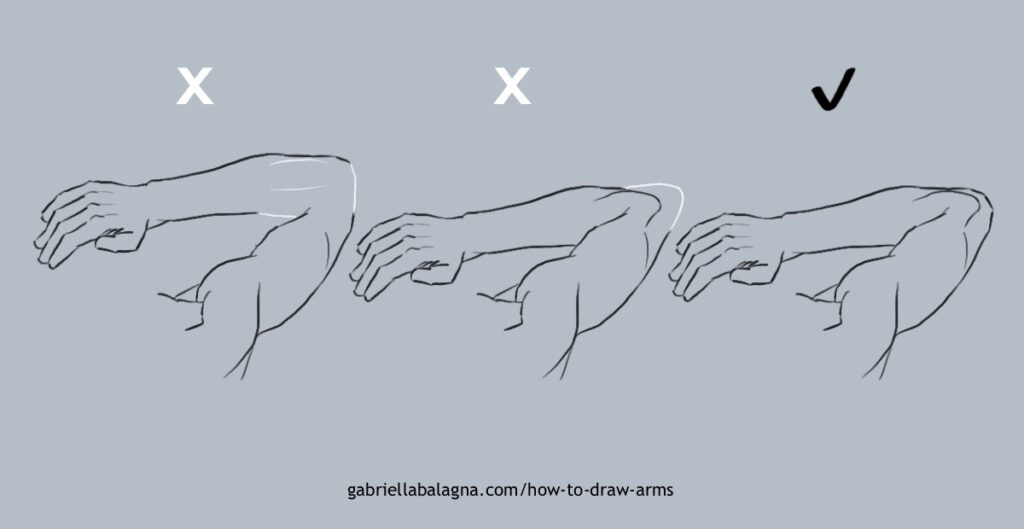
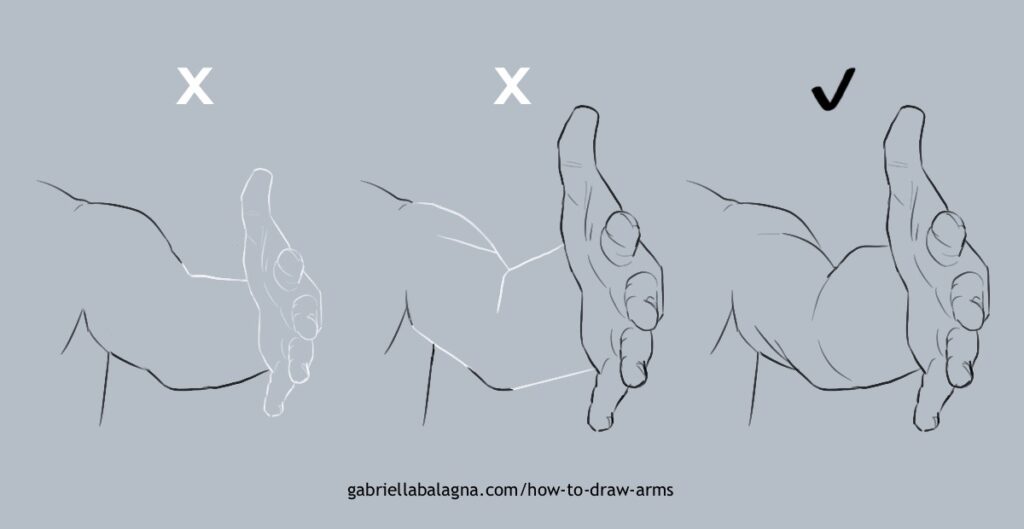
However, it is easy to forget is that foreshortening also involves enlargement. Due to the way our eyes work, things that are closer to us appear bigger. But when drawing arms, it is a common mistake to forget this concept, or to not enlarge things enough. (An example of this is the left drawing in the image below.) So if the hand is coming forward, pay special attention to enlarge it and the forearm enough.
Additionally, another problem with foreshortening, is neglecting to show the cylindrical forms of the arm. (An example of this mistake is the middle drawing in the image below.) The arms are not flat. Nor are they tubes. Rather, arms are bones covered with all different shapes of curvy muscles. So make to use lots of curvy lines to show the roundness of the foreshortened arm. (A good example of this is the right drawing in the image below.)
Summary
In summary, those are ten common mistakes for drawing arms and how to fix them. By using these tips, you can improve the sketching, anatomy, and poses of the arms you draw. So now it is time to apply the tips, and try drawing some arms. Comment below to let me know if these tips help you improve your drawings!
Want some more drawing tips? Subscribe for more art tutorials like this. As well, learn how to draw hands. Last, but not least, start reading my new comic, Kindred Not.
Discussion ¬